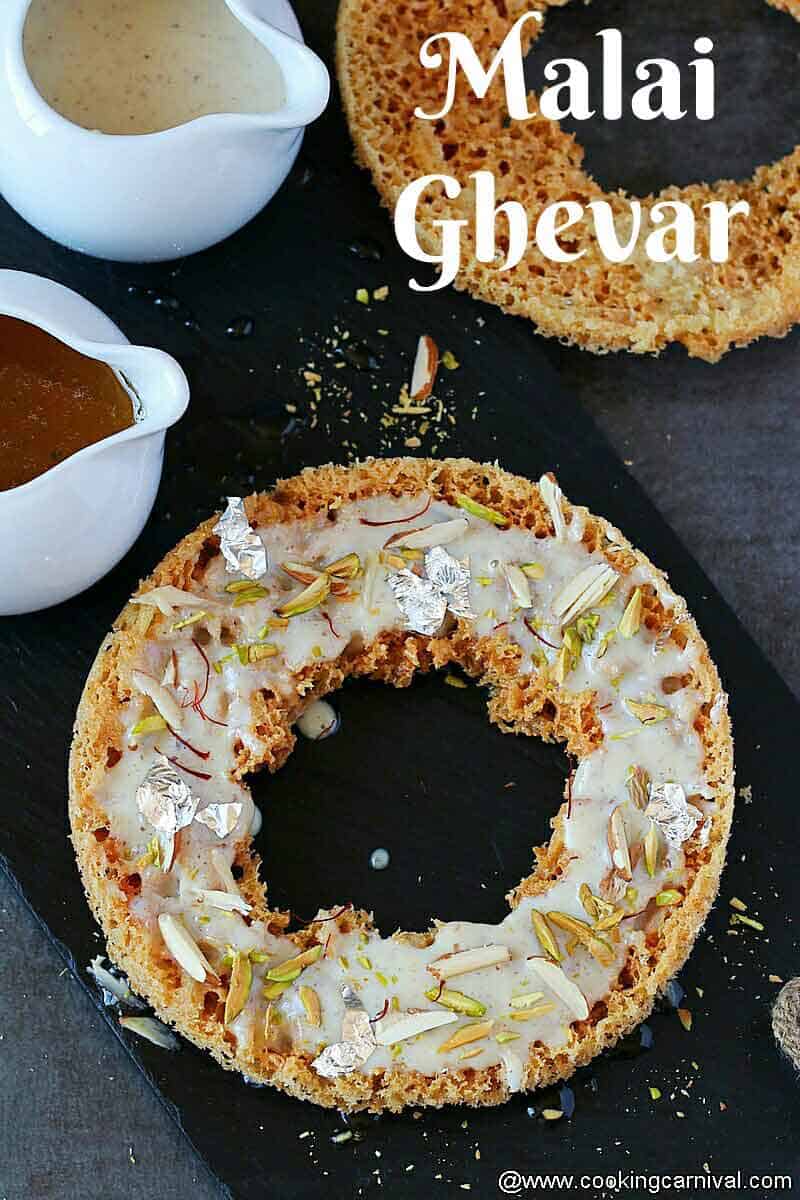
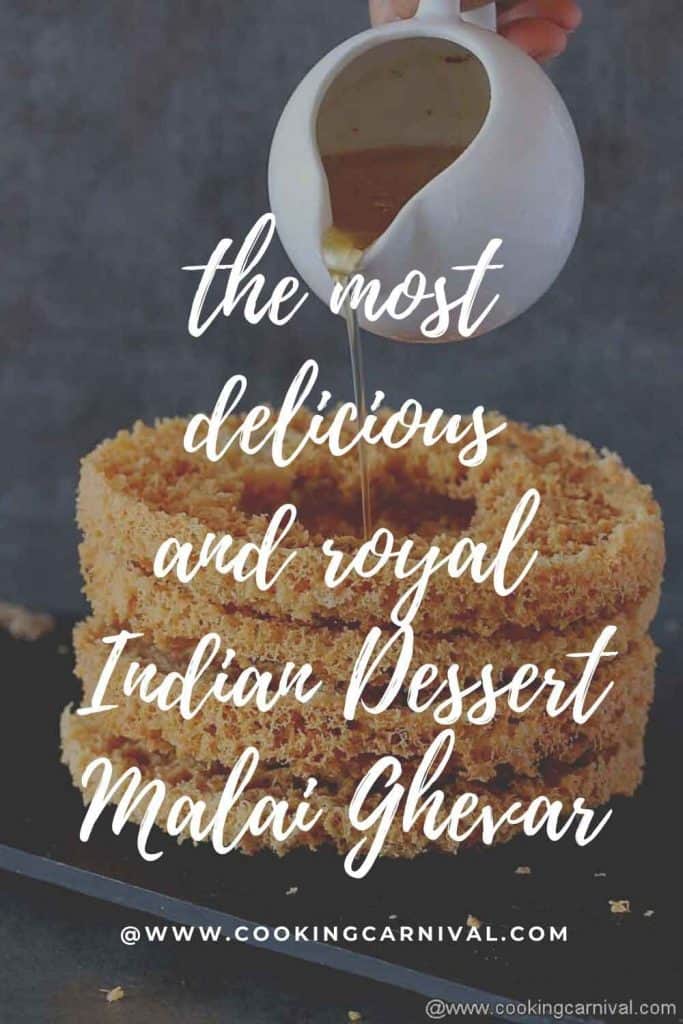
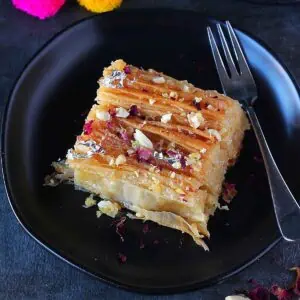
Malai Ghevar, also called Rabdi ghewar, is a Rajasthani delicacy made during the Hindu month of Shravan. It is very popular sweet during festivals like Teej and Rakshabandhan.
I love this Indian Mithai. When you take a bite of this rich, exotic, and lip-smacking dessert, you feel the joyride of a wonderland. It turned out so lip-smacking and looked utterly gorgeous as well.
Let’s learn how to make this unique and decadent Indian sweet at home.
Jump to:
Raksha Bandhan or Rakhi is around the corner. At this festival, sisters tie a sacred thread on their brother’s wrist as a symbol of their love and good wishes.
The brothers in turn promise to love and protect their sisters forever. Sisters also get gifts on this day too.
Rakshabandha (all Indian festivals actually) is very close to my heart.
This year Rakhi falls on the 3rd of August and as usual, I will be missing it being away from home. This is the 11th year I am not with brother to tie the rakhi personally on his hand.
Of course, I have already sent my rakhi to my brother but the feeling of not being with him to tie the rakhi on his hand makes me sad. 🙁
So on this Rakhi, I decided to share my brother’s favorite sweet Ghevar recipe with you all.
Note – Not only for Rakshabhandan, but Malai Ghewar can be made on regular days as well for a change. 😉

Anyways, back to the recipe. I am going to share very important tips and tricks throughout the post so please don’t skip and read the post carefully to achieve store-bought like result in the first attempt. 🙂
What is Ghevar?
Does Ghevar sound something completely new and complicated? Don’t worry, I am here to help you.
Ghevar is a traditional Rajasthani mithai or sweet dish which originates from the Indian state of Rajasthan but is also popular in the surrounding states.
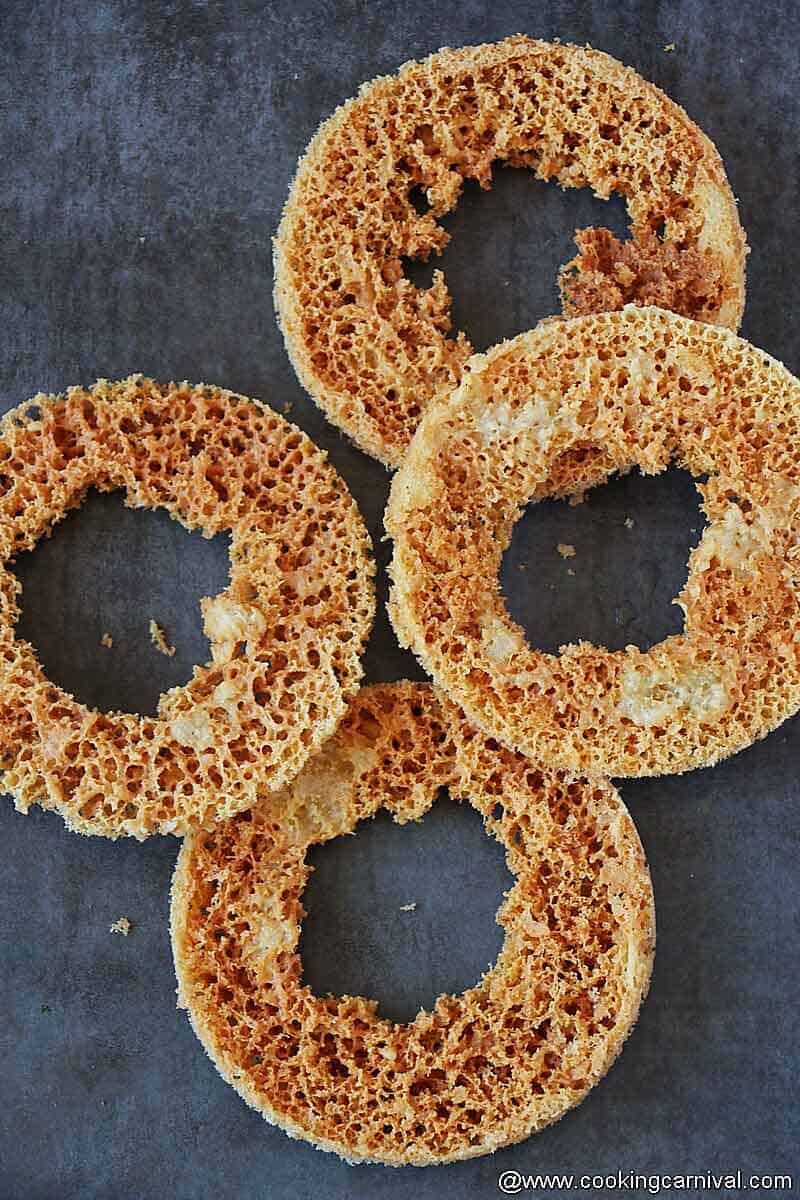
It is a round-shaped Indian sweet having a honeycomb pattern. It is prepared using maida (all-purpose flour) and ghee (clarified butter).
I also mix a small quantity of besan (gram flour) to enhance its taste and give a nice color. A batter is made using these ingredients and dropped from a height in hot Ghee or oil.
Local sweet shops use a special disc-shaped metal mould during its preparation to give it a round shape.
Is this dessert difficult to make at home?
I would not say that to make ghevar at home is an effortless task, but I can guarantee you that it’s not that difficult either.
A little practice and lots of patience are all you need, and you will be able to nail it. The first and second ghevar might not get perfect, but I guarantee you the third one will be the perfect one. Again I highly recommend reading the post very very carefully and follow each step.
Let’s see what are the ingredients required to make this recipe –
Below pic is an overview of the ingredients in the recipe (very handy to use as a visual grocery list at the store). Quantities are mentioned in the recipe card.

How to make this recipe? Step by step process
The ingredients are really basic. But the trick lies in making ghevar batter and frying it perfectly. You need the right consistency of the batter and the right amount of heat to fry these perfectly crispy discs.
There are 5 basic steps of this recipe –
- Making batter
Sieve Maida (all-purpose flour) and besan well. Keep it aside.
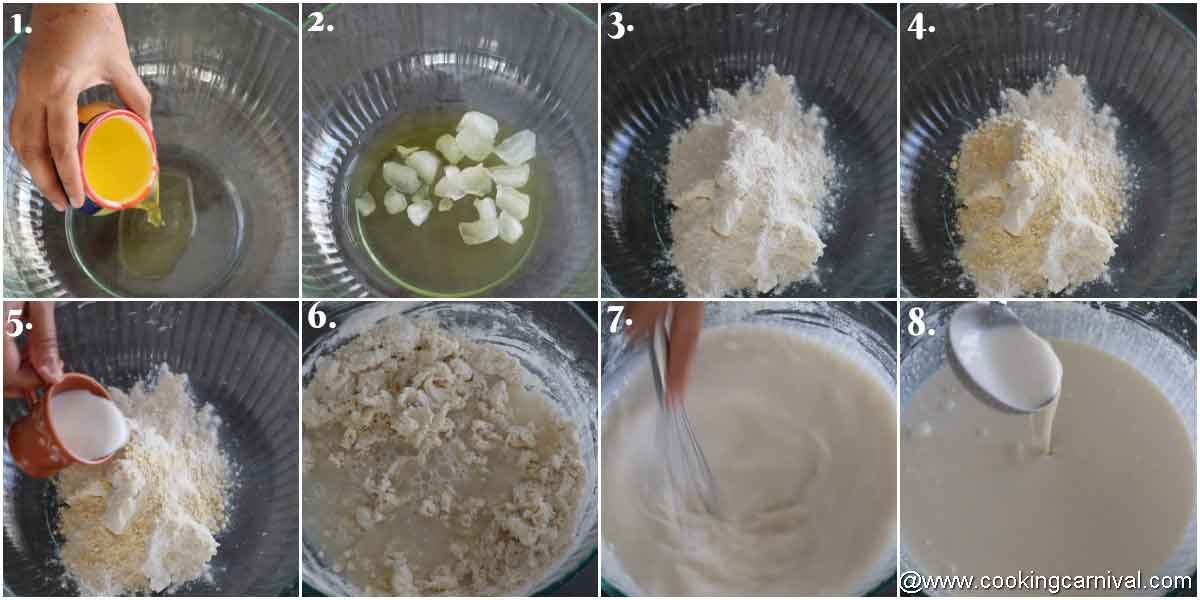
Take ghee in a large bowl. (Photo 1)
Add 6 to 7 ice cubes and start to rub. Rub the ghee in a circular motion till the ghee thickens and turns creamy. Keep rubbing for 2-3 minutes or till the ghee turns whitish. Take out the remaining ice cubes. (Photo 2)
Now add maida and besan. Crumble well. Add chilled milk and give a rough mix. (Photo 3 to 5)
Add 1 cup of chilled water and make a thick batter. Add another cup of chilled water and using a whisk, start to whisk the batter for 5 minutes. You can use a stand mixer too for this process. (photo 6)
Add 1 teaspoon lemon juice and another cup and half of chilled water. Continue to whisk till there are no lumps. Add more chilled water if needed to make a free-flowing batter. (Photo 7)
Prepare a smooth flowing consistency ghevar batter. The batter is ready to make ghevar, keep the batter in the fridge till you are ready to fry. (Photo 8)
Notes and pro-tips
- I would highly recommend sieving the all-purpose flour (Maida) and the Gram flour (Besan) before proceeding with the batter preparation.
- Make sure to rub the ghee with ice till it reaches a thick cream-like consistency and leaves all sides of the bowl.
- To make the batter, milk, ghee, and water MUST BE cold. This will ensure that your ghevar turns out crispy and gets good pores and a web-like pattern.
- The batter for the ghevar should be of pouring consistency. It should drop easily and freely from the ladle or container you use. You may need to add more cold water if your batter isn’t of pouring consistency.
- Whisk the better well without allowing ghee or milk from curdling
- If you are planning to make the batter ahead of time or for some reason you couldn’t make ghevar right away, please place the batter into the FRIDGE. Don’t keep it at room temperature for a long time.
- Frying Ghewar
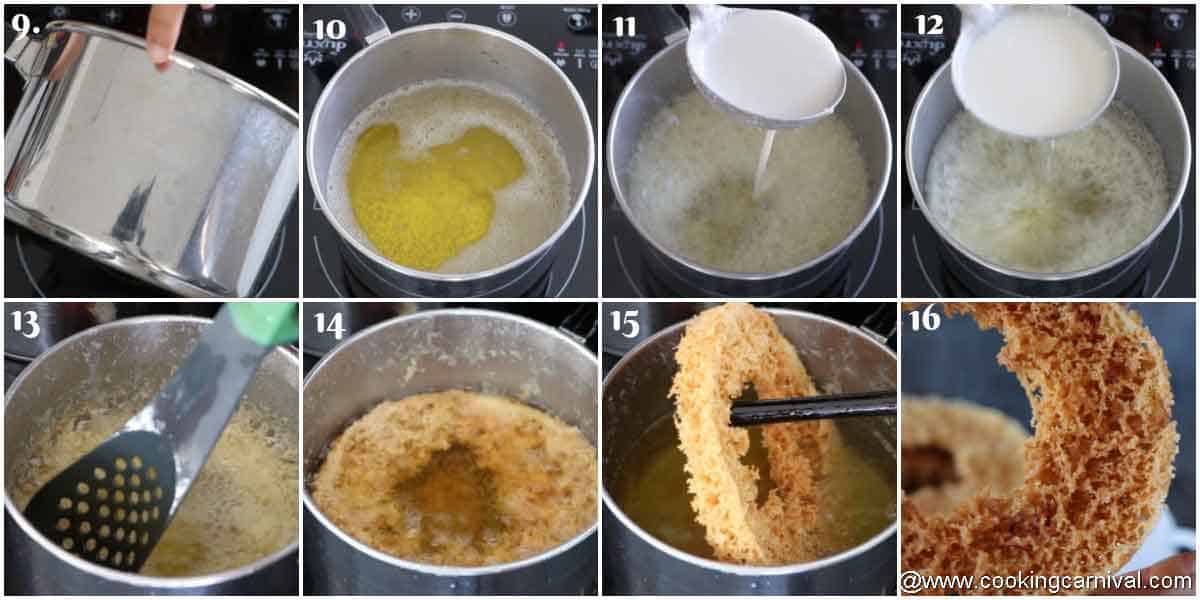
Fill the half pan with ghee or oil in a tall saucepan (my pan size is 6inch diameter and 4-inch depth). (Photo 9 and 10)
Make sure the ghee is very hot, then pour some batter with the help of ladle (about 2 tablespoon of batter at a time) keeping a good distance from ghee (approx 5 to 6 inch). The batter will splatter and within a couple of seconds, the froth subsides. Pour some more batter in the center in a thin stream keeping distance from ghee. (photo 11 and 12)
Repeat 15 to 20 times depending on the size of the kadhai (Pan). Make sure to make a hole in the center with a wooden spatula. (Refer video given in recipe card for a better idea).
Fry on high to medium flame. Take some ghee from the center and pour it on top of the ghevar.
Once the ghevar starts to golden brown, scrape the sides with a knife or spoon and push ghevar into the ghee for further frying from the top. (Photo 13 and 14)
With the help of a fork or Rolling pin, pull the ghevar out gently, and drain off the ghee completely. Take it into the strainer. Place the strainer on a big pot and let the excess ghee drain completely. (Photo 15)
Make all the remaining ghevars the same way. (Photo 16)
Notes and pro-tips
- Use a deep pan to fry ghevar. The batter comes up as you drop it from a height, the ghee is super hot and so there is every chance of an accident if you don’t use a deep pan. It’s best to use a deep pan with tall sides. The size of the pan I am using is 6 inches in diameter and 4 inches in depth.
- I have used ghee to fry the ghevar. You can use oil or mix of oil and ghee too. Make sure to use flavorless oil ONLY.
- The pan should be 60% filled with oil or ghee.
- Always fry Ghevar in hot oil or ghee. Ghee needs to be really hot else the pattern won’t form.
- Be very CAREFUL while dropping the batter into the ghee.
- I have used a round ladle to pour the batter. But if you are making for the first time, I would recommend using a container with a pointed tip to drop the batter into the hot oil. You may use squeezable bottles like this. The pattern will be more prominent and nice if you use a pointed tip.
- Always drop/pour the batter into the center of the pan, at the same spot. This way batter will distribute evenly each time. Drop the batter, little by little in a constant flow. Don’t worry if it’s not distributed evenly. For the first try, as long as it tastes great, you are good to go.
- Note that the quantity of batter has to be approximately 2 tablespoon in regular intervals. Drop a small amount of batter, then wait for the foam to settle and then drop the next batch of batter.
- The batter has to be poured at a height of 5 to 6 inches. Otherwise, you may miss the porous texture to ghewar, and also it may stick to the bottom. The height is important to get that web-like pattern.
- During the entire frying process make sure ghevar has to float and not settle at the bottom.
- How many ladles of batter you would need per ghevar really depends on the size of the pan you are frying in and also how thick you want your ghevar to be. I used around 4 ladles of batter to make 1 ghevar.
- Once fried, carefully remove the ghevar because it’s very delicate. You have to be super careful while handling it.
- Ghevar can be stored for a month in an airtight container and dip in sugar syrup just before serving.
- Making Sugar syrup
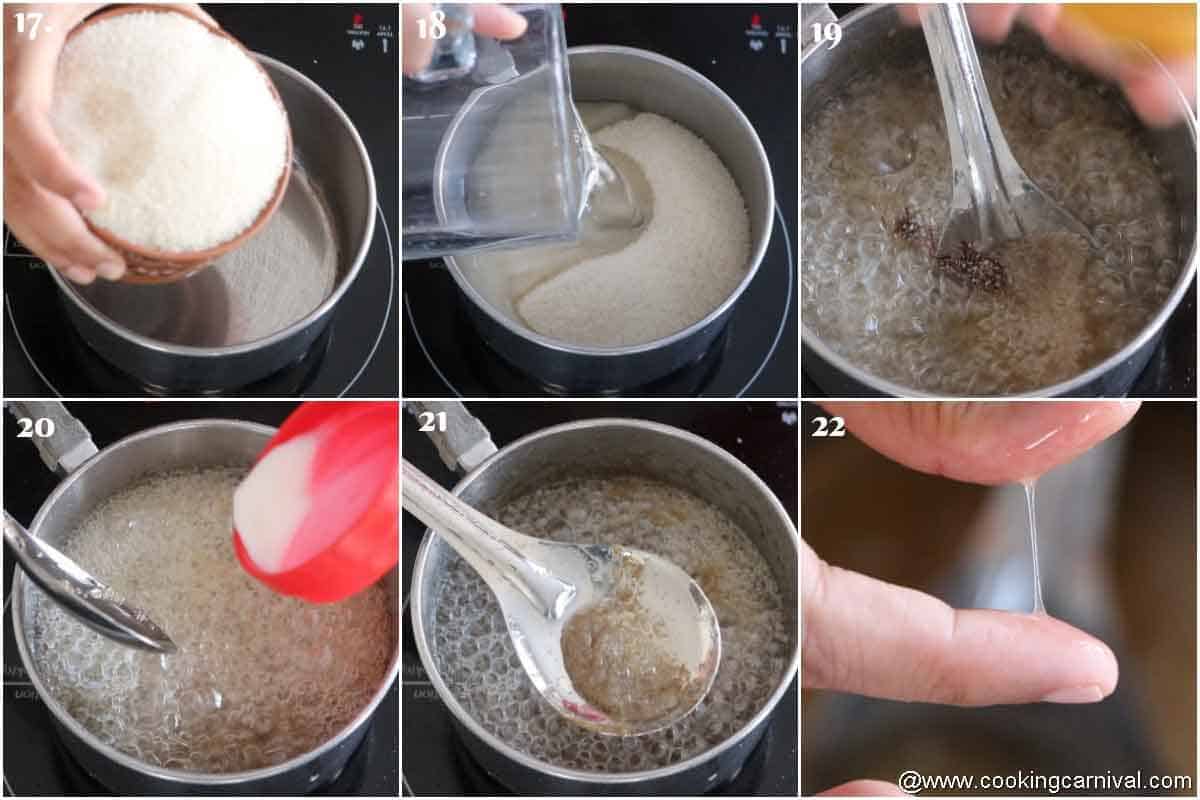
Take sugar and water in a pan. Switch on the flame and place the pan on the stovetop. (Photo 17 and 18)
Dissolve the sugar completely and let it comes to a boil. (Photo 19)
Add 1 teaspoon milk to remove the dirt from sugar. Add milk only when sugar melts and syrup starts boiling. (photo 20)
Then let it boil, after some time dirt will get separated and will float at the top of the syrup. Take out the dirt with the help of perforated ladle or spoon and throw it. (Photo 21)
After some time more dirt will float, then remove and throw it also. Do this till the syrup cleaned.
Continue to boil the syrup till 1 string consistency is attained. (Photo 22)
Switch off the flame, add cardamom powder and saffron. This step is optional.
Let the sugar syrup cools down a bit.
Notes and Pro-tips
- You can avoid the step of removing the dirt from sugar.
- I have used granulated organic sugar. You may use powdered sugar too.
- Adjust the sweetness according to your liking.
- Pouring the Sugar syrup on ghewar
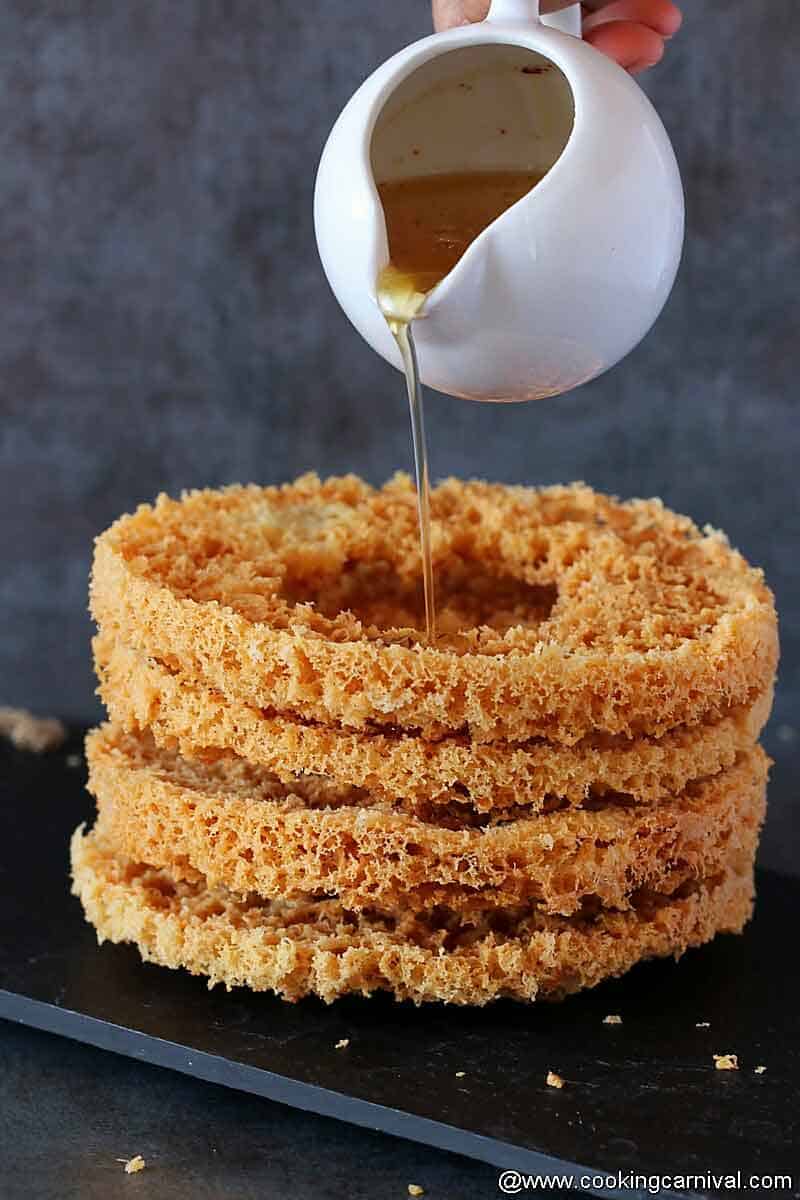
Pour the sugar syrup over ghevar or dip the ghevar in sugar syrup. I prefer pouring syrup over ghevar to control the sweetness. You can stack ghaver and pour the chasni(sugar syrup) or take one and pour some syrup.
Again keep the ghevar on a sieve in a plate to remove excess syrup. Let them dry in open for about 1 hour.
Notes and pro-tips
Make sure the syrup is warm when pouring on ghevar.
- Garnishing with Rabdi (Malai), nuts, saffron, and silver vark. (optional step)
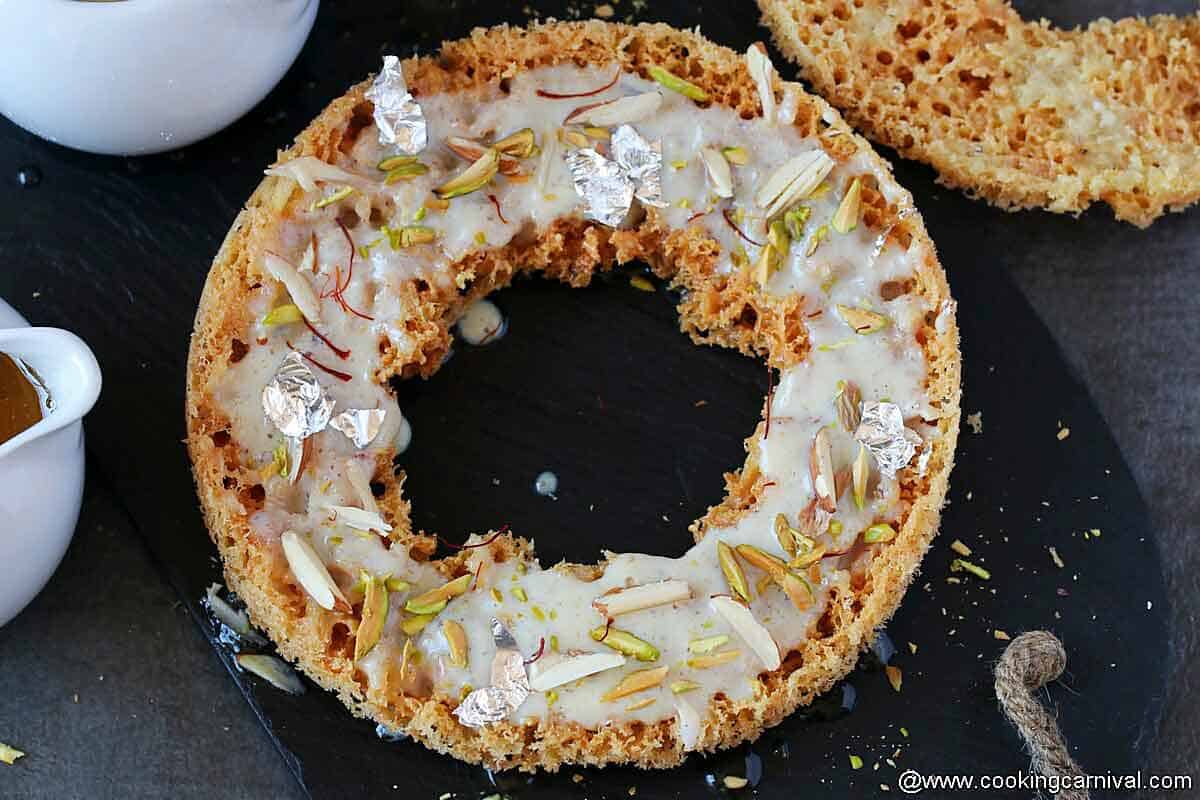
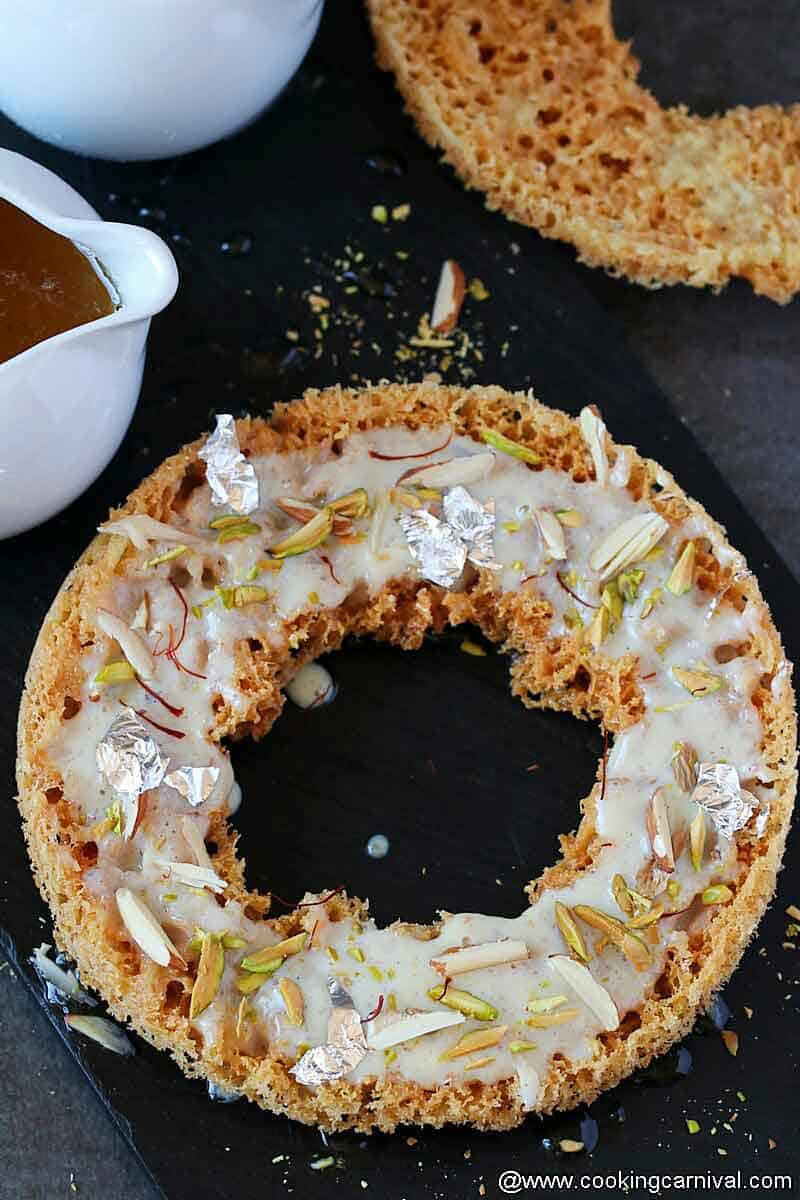
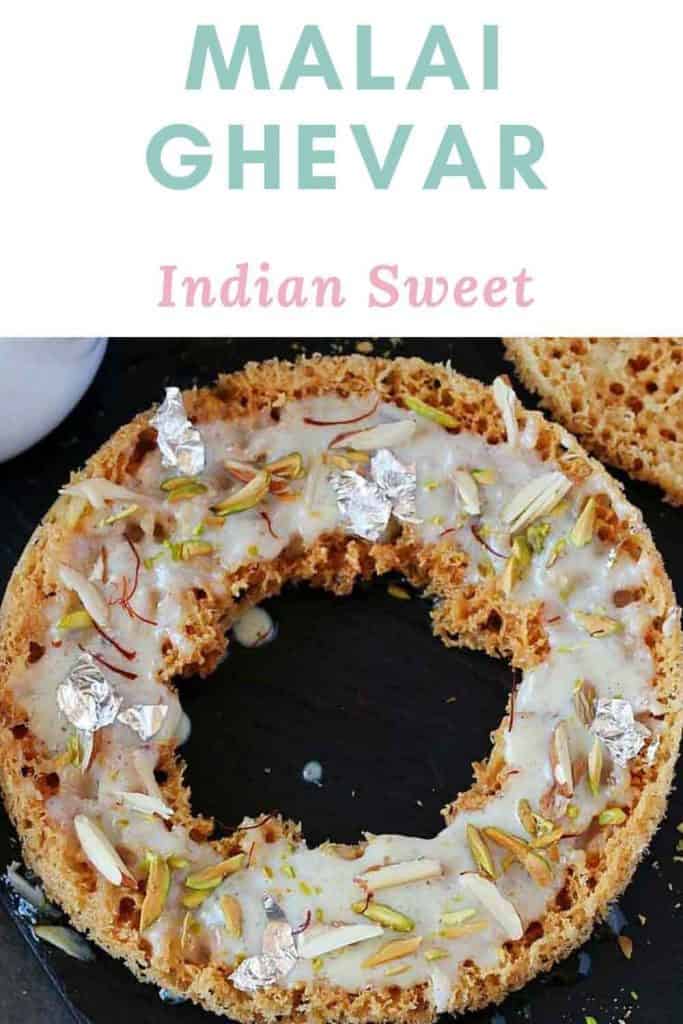
Once the ghevar is set with syrup, garnish it with Radbdi, pistachios, almonds, some saffron strands, and silver vark.
To make Malai (Rabdi) for ghevar, I have used my instant rabdi mix recipe. You can use a store-bought rabdi too.
Malai ghevar is ready. Enjoy!
Pro-tip
You can add yellow or orange food color to the rabdi to give saffrony color.
Quick FAQs –
How To Eat? Sweetened Vs Unsweetened –
People make Ghevar as a dessert to celebrate festivals and occasions.
Some people keep it unsweetened for longer shelf life or prefer freshly prepared sugar syrup because the sweetened variant is soggy.
For the crisp ghevar, the trick is to prepare sugar syrup and pour it over the Ghevar just before eating.
If you don’t like or worry about the crisp one, then you can pour all the syrup and enjoy this Rajasthani delicacy later.
How to serve?
There are 3 ways we this mithai can be served –
- Plain Ghevar: In this version, sugar syrup is poured over it and then topped with some nuts.
- Malai Ghevar: In this version, sugar syrup is poured over the ghevar first. Then they are topped with warm rabri and garnished with nuts, saffron, and silver vark.
- Mawa Ghevar: In this, sugar syrup is poured over the Ghevar first. After that, they are topped with sweetened mawa and nuts.
How to Store & what is the Shelf Life?
It is best to store an unsweetened Ghevar because it stays good for about a month in dry weather. The shelf life reduces in humid conditions. One can always prepare sugar syrup when consuming.
For the sweetened version, it stays good for 3-5 days depending on the weather. You can store this in an airtight container in a fridge. It stays good for up to a week.
Do you need a special mould to make ghevar?
the local halwai or the ones prepared in the store are made using a special disc-shaped ring. But, as I have shown to you in this post, you can make this without a special mould too. You need to use a good deep pan.
More Indian Sweet recipes
We’ll also love your feedback, Please click on the stars in the recipe card below to rate. Or tag me on Instagram or Facebook by using #cookingcarnival
Subscribe to our YouTube Channel for tasty and easy video recipes.
Malai Ghevar
Ingredients
For Ghevar batter
- 2 cups – all-purpose flour maida
- 2 teaspoon – Gram flour besan
- ⅓ cup – melted Ghee Clarified butter
- ¼ cup – cold milk
- 3.5 cups – cold water
- some ice cubes
- Ghee or oil for frying
For Sugar syrup (chasni)
- 1.5 cups – sugar
- 1 cup – water
- pinch of saffron
- ⅛ teaspoon – cardamom powder
- 1 teaspoon – milk
For Malai / Rabdi
- 1 cup – milk powder
- 1 tablespoon – corn starch corn flour
- ½ cup – sugar
- 500 ml – Whole milk Full fat milk
- ¼ cup almonds, chopped
For serving/garnishing
- chopped almonds, pistachios
- saffron
- silver vark
Instructions
Making batter
- The First step is to read all the notes really carefully.
- Sieve Maida (all-purpose flour) and besan well. Keep it aside.
- Take ghee in a large bowl.
- Add 6 to 7 ice cubes and start to rub. Rub the ghee in a circular motion till the ghee thickens and turns creamy. Keep rubbing for 2-3 minutes or till the ghee turns whitish. Take out the remaining ice cubes.
- Now add maida and besan. Crumble well. Add chilled milk and give a rough mix.
- Add 1 cup of chilled water and make a thick batter. Add another cup of chilled water and using a whisk, start to whisk the batter for 5 minutes. You can use a stand mixer too for this process.
- Add 1 teaspoon lemon juice and another cup and half of chilled water. Continue to whisk till there are no lumps. Add more chilled water if needed to make a free-flowing batter.
- Prepare a smooth flowing consistency ghevar batter. The batter is ready to make ghevar, keep the batter in the fridge till you are ready to fry.
Frying Ghevar
- Fill the half pan with ghee or oil in a tall saucepan (my pan size is 6inch diameter and 4-inch depth).
- Make sure the ghee is very hot, then pour some batter with the help of ladle (about 2 tablespoon of batter at a time) keeping a good distance from ghee (approx 5 to 6 inch). The batter will splatter and within a couple of seconds, the froth subsides. Pour some more batter in the center in a thin stream keeping distance from ghee.
- Repeat 15 to 20 times depending on the size of the kadhai (Pan). Make sure to make a hole in the center with a wooden spatula. (Refer video given in recipe card for a better idea).
- Fry on high to medium flame. Take some ghee from the center and pour it on top of the ghevar.
- Once the ghevar starts to golden brown, scrape the sides with a knife or spoon and push ghevar into the ghee for further frying from the top.
- With the help of a fork or Rolling pin, pull the ghevar out gently, and drain off the ghee completely. Take it into the strainer. Place the strainer on a big pot and let the excess ghee drain completely.
- Make all the remaining ghevars the same way.
Making Sugar syrup
- Take sugar and water in a pan. Switch on the flame and place the pan on the stovetop.
- Dissolve the sugar completely and let it comes to a boil.
- Add 1 teaspoon milk to remove the dirt from sugar. Add milk only when sugar melts and syrup starts boiling.
- Then let it boil, after some time dirt will get separated and will float at the top of the syrup. Take out the dirt with the help of perforated ladle or spoon and throw it.
- After some time more dirt will float, then remove and throw it also. Do this till the syrup cleaned.
- Continue to boil the syrup till 1 string consistency is attained.
- Switch off the flame, add cardamom powder and saffron. This step is optional.
- Let the sugar syrup cools down a bit.
Pouring the Sugar syrup on ghevar
- Pour the sugar syrup over ghevar or dip the ghevar in sugar syrup. I prefer pouring syrup over ghevar to control the sweetness.
- Again keep the ghevar on a sieve in a plate to remove excess syrup. Let them dry in open for about 1 hour.
For Instant Rabdi/malai
- Take milk powder, corn starch, almonds, and sugar in a bowl. Mix very well.
- Take milk in a heavy bottem pan, add the prepared milk powder mixture and whisk really well.
- Switch on the flame and cook this mixture for about 10 minutes or until it thickens on a low flame. STIR CONTINUOUSLY. It can easily burn from the bottom. So make sure you stir continuously.
- Let the rabdi cool down completely.
Garnishing
- Once the ghevar is set with syrup, garnish it with Rabdi(malai), pistachios, almonds, some saffron strands, and silver vark.
- Malai ghevar is ready. Enjoy!
Video
Notes
Notes and pro-tips for Ghevar Batter
- I would highly recommend sieving the all-purpose flour (Maida) and the Gram flour (Besan) before proceeding with the batter preparation.
- Make sure to rub the ghee with ice till it reaches a thick cream-like consistency and leaves all sides of the bowl.
- To make the batter, milk, ghee, and water MUST BE cold. This will ensure that your ghevar turns out crispy and gets good pores and a web-like pattern.
- The batter for the ghevar should be of pouring consistency. It should drop easily and freely from the ladle or container you use. You may need to add more cold water if your batter isn’t of pouring consistency.
- Whisk the better well without allowing ghee or milk from curdling.
- If you are planning to make the batter ahead of time or for some reason you couldn’t make ghevar right away, please place the batter into the FRIDGE. Don’t keep it at room temperature for a long time.
Notes and pro-tips for Frying ghevar
- Use a deep pan to fry ghevar. The batter comes up as you drop it from a height, the ghee is super hot and so there is every chance of an accident if you don’t use a deep pan. It’s best to use a deep pan with tall sides. The size of the pan I am using is 6 inches in diameter and 4 inches in depth.
- I have used ghee to fry the ghevar. You can use oil or mix of oil and ghee too.
- Make sure to use flavorless oil ONLY.
- The pan should be half filled with oil or ghee.
- Always fry Ghevar in hot oil or ghee. Ghee needs to be really hot else the pattern won’t form.
- Be very CAREFUL while dropping the batter into the ghee.
- I have used a round ladle to pour the batter. But if you are making for the first time, I would recommend using a container with a pointed tip to drop the batter into the hot oil. You may use squeezable bottles like this. The pattern will be more prominent and nice if you use a pointed tip.
- Always drop/pour the batter into the center of the pan, at the same spot. This way batter will distribute evenly each time. Drop the batter, little by little in a constant flow. Don’t worry if it’s not distributed evenly. For the first try, as long as it tastes great, you are good to go.
- Note that the quantity of batter has to be approximately 2 tablespoon in regular intervals. Drop a small amount of batter, then wait for the foam to settle and then drop the next batch of batter.
- The batter has to be poured at a height of 5 to 6 inches. Otherwise, you may miss the porous texture to ghewar, and also it may stick to the bottom. The height is important to get that web-like pattern.
- During the entire frying process make sure ghevar has to float and not settle at the bottom.
- How many ladles of batter you would need per ghevar really depends on the size of the pan you are frying in and also how thick you want your ghevar to be. I used around 4 ladles of batter to make 1 ghevar.
- Once fried, carefully remove the ghevar because it’s very delicate. You have to be super careful while handling it.
- Ghevar can be stored for a month in an airtight container and dip in sugar syrup just before serving.
Notes and Pro-tips for syrup
- You can avoid the step of removing the dirt from sugar.
- I have used granulated organic sugar. You may use powdered sugar too.
Adjust the sweetness according to your liking. - Make sure the syrup is warm when pouring on ghevar.
- You can add yellow or orange food color to the rabdi to give saffrony color.
HOW TO EAT? SWEETENED VS UNSWEETENED –
People make Ghevar as a dessert to celebrate festivals and occasions. Some people keep it unsweetened for longer shelf life or prefer freshly prepared sugar syrup because the sweetened variant is soggy. For the crisp ghevar, the trick is to prepare sugar syrup and pour it over the Ghevar just before eating. If you don’t like or worry about the crisp one, then you can pour all the syrup and enjoy this Rajasthani delicacy later.HOW TO SERVE?
There are 3 ways we this mithai can be served – Plain Ghevar: In this version, sugar syrup is poured over it and then topped with some nuts.Malai Ghevar: In this version, sugar syrup is poured over the ghevar first. Then they are topped with warm rabri and garnished with nuts, saffron, and silver vark.
Mawa Ghevar: In this, sugar syrup is poured over the Ghevar first. After that, they are topped with sweetened mawa and nuts.
HOW TO STORE & WHAT IS THE SHELF LIFE?
It is best to store an unsweetened Ghevar because it stays good for about a month in dry weather. The shelf life reduces in humid conditions. One can always prepare sugar syrup when consuming. For the sweetened version, it stays good for 3-5 days depending on the weather. You can store this in an airtight container in a fridge. It stays good for up to a week.DO YOU NEED A SPECIAL MOULD TO MAKE GHEVAR?
The local halwai or the ones prepared in the store are made using a special disc-shaped ring. But, as I have shown to you in this post, you can make this without a special mould too. You need to use a good deep pan.Nutrition
Warm regards,
Dhwani.



Ghevar looks great! It’s my favorite growing up. I wish I could grab it off screen!
Thanks a lot Khushboo! 🙂
How to make the soggy sweetened ghevar crisp again?
As far as I know, its not possible to crisp soggy sweetened ghevar.