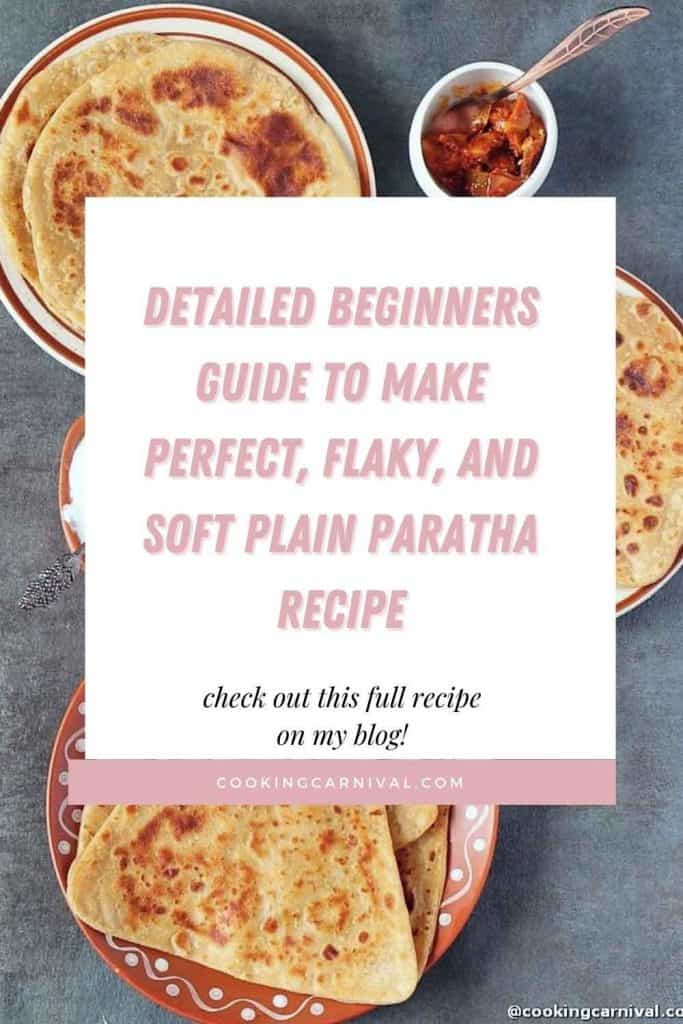
Detailed beginners guide to make perfect, flaky, and soft Plain Parathas recipe at home!
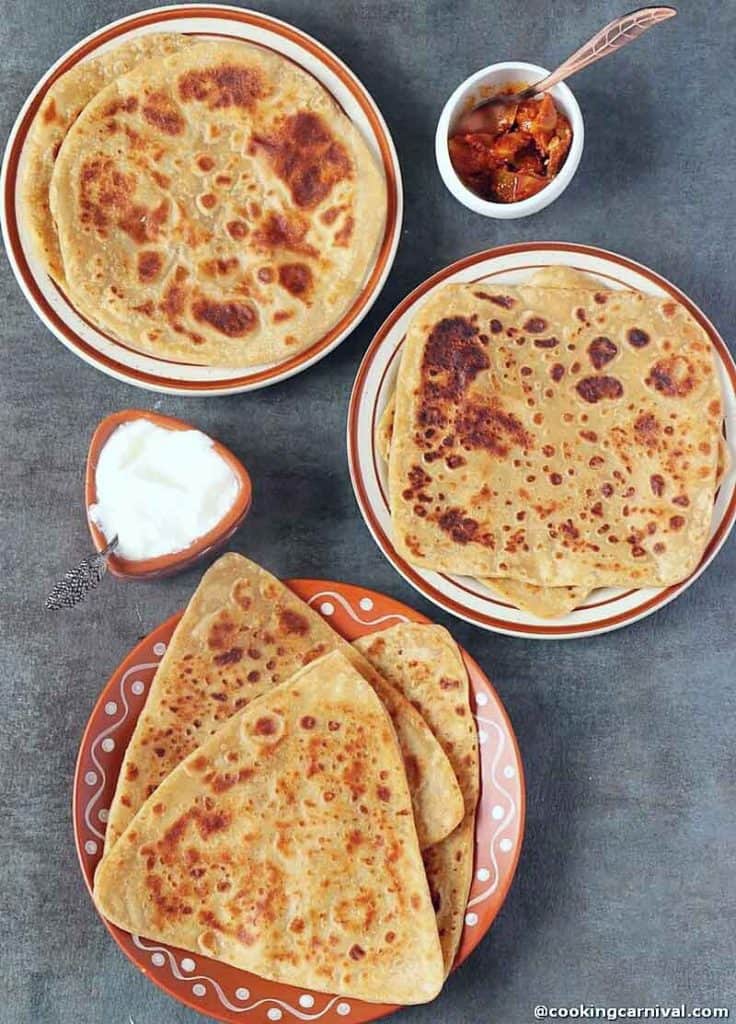
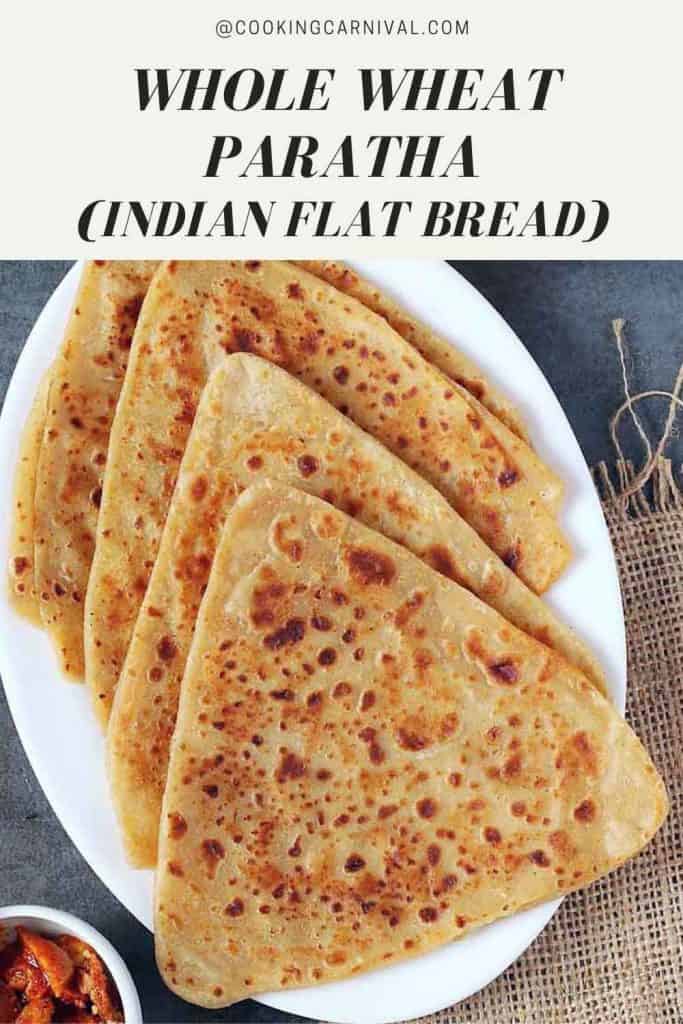
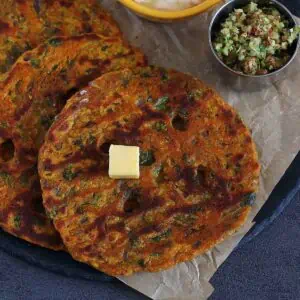
The plain parathas, also known as Tawa Paratha is an Indian unleavened flatbread that can complement almost any dish and can be served with curry, pickle, raita, curd, pickle, chutney, or also make a great accompaniment with a hot cup of chai.
In this recipe post, I will share step-by-step how to make plain parathas in 3 shapes – triangle, round, and square.
Jump to:
What are Parathas?
Parathas are staples to many Indian homes. They are soft, thin, and flaky flatbread that can be eaten for breakfast lunch, or dinner.
Parathas are also great to pack in a Tiffin for lunch, especially for toddlers and kids. They keep soft for longer.
There are many varieties of paratha like Aloo paratha, gobi paratha, mooli paratha, paneer paratha, etc.
Today, I am sharing the Plain paratha recipe made with whole wheat (atta) with you all.
Plain parathas are made with whole wheat flour that is kneaded using salt, oil, and water. The dough is then rolled into layered and cooked on a hot griddle/tawa with some ghee or oil until light golden brown spots appear on both sides.
Your kitchen will fill with a wonderful aroma.
This recipe can be multiplied as needed and made in advance, cooking up from frozen on demand.
Although making them can be a bit of a time-consuming effort, the ingredients and techniques are simple enough that anyone can have freshly made flatbread at home.
What is the difference between Paratha, Naan, and Roti?
Paratha, naan, and roti are all different versions of Indian flatbread. They each have similar ingredients and all are easy to make.
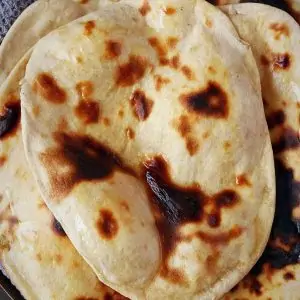
Naan is different from roti and paratha. It is made with all-purpose flour whereas roti and paratha (usually) are made with whole wheat flour.
Naan uses yeast to provide a bit of rising to the dough. Whereas Roti and paratha don’t require yeast to rise the dough.
Roti is a bit thinner than both naan and paratha. Paratha is the flakiest of the three variations of flatbread.
Ingredients needed
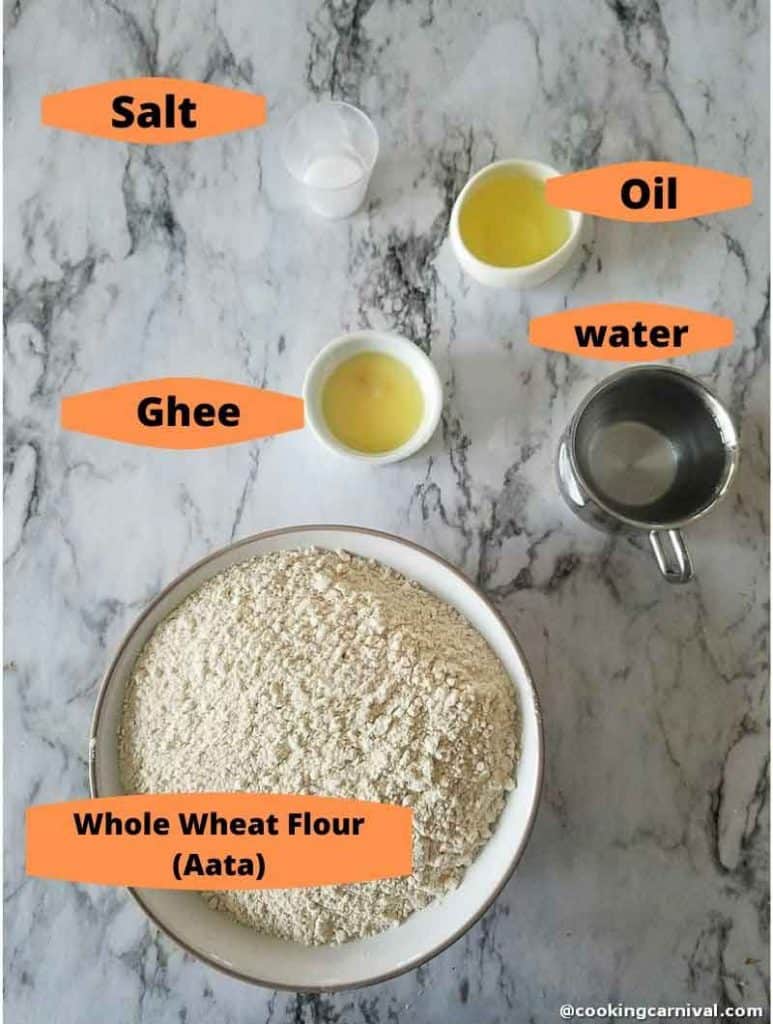
You will need
- Whole wheat flour – Parathas are made with finely ground whole wheat flour also known as Atta. You can buy the flour from an Indian grocery store or on Amazon.
- Some of my favorite brands are – Aashirvaad Select Sharbati Atta, Sujata Chakki Atta, and Aashirvaad Whole Wheat Atta.
- Fat – for the dough, I have used oil and for cooking the paratha, I have used ghee.
- Salt
- Water – Make sure to use room temperature water.
How to make plain paratha? Step by step process
Step – 1 Make the dough
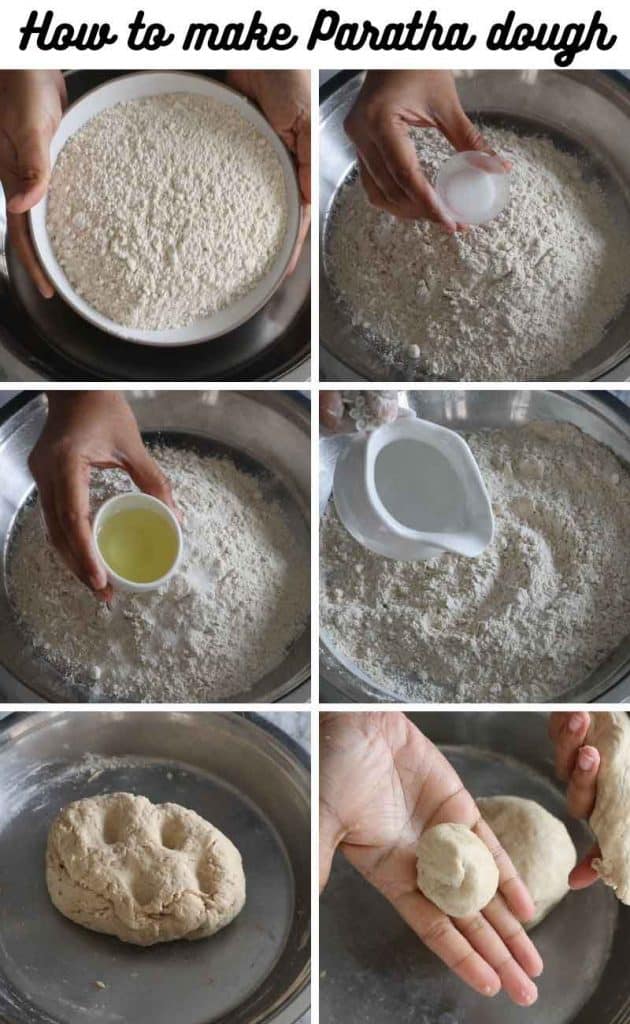
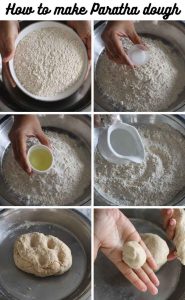
In a large bowl, mix the flour, salt, and oil. Slowly add water, a little bit at a time, mixing with your hands until soft dough forms. Depending on the brand of the flour you may need more or less water so only add a little bit at a time.
Once the dough is formed, allow resting for 10 to 20 minutes covered with damp kitchen.
Divide the dough into 12 pieces and roll each piece on the palm of your hands into a round ball. Keep the balls covered all the time.
Step – 2 Rolling the dough
Here are 3 different ways to roll the paratha –
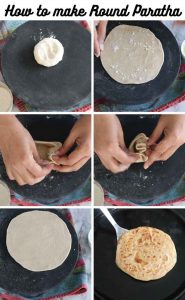
1. Round Paratha
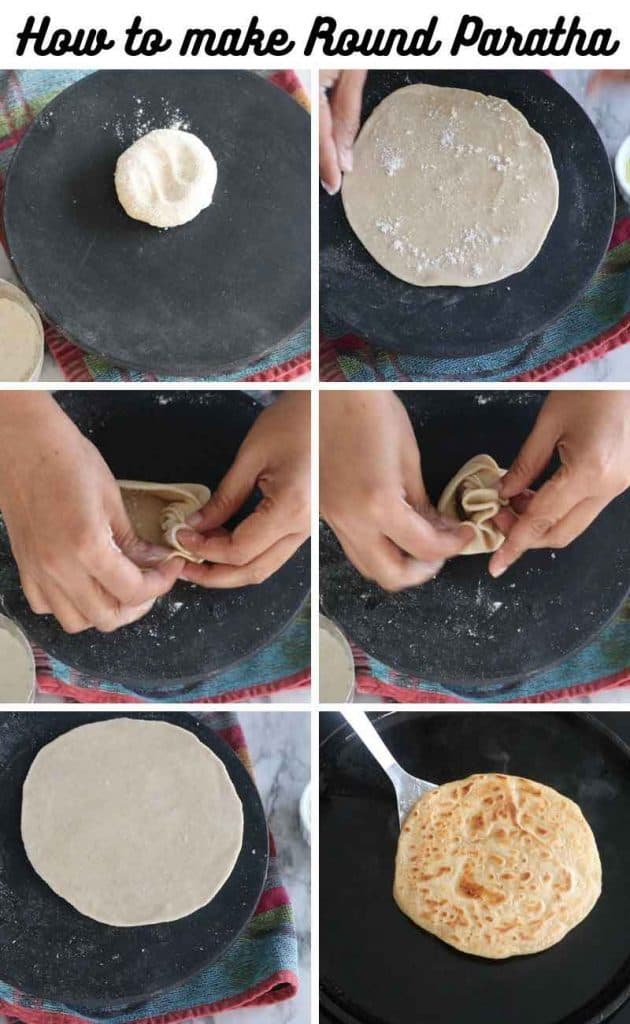
- Dip a ball in dry flour, place it on the work surface or rolling board(chakla), and roll with the rolling pin. Roll into a circle of about 4 inches diameter.
- Apply some ghee and some flour.
- Gather all the edges and make a ball. Dust the ball again with flour and start rolling using the rolling pin.
- Do not apply too much pressure while rolling. Apply equal pressure on all sides while rolling.
- When you roll with gentle hands, the dough flattens and moves in a circular motion. You can also turn the paratha with your hands at 90 degrees multiple times while rolling so that it forms a round disc.
- Apply more flour if required while rolling.
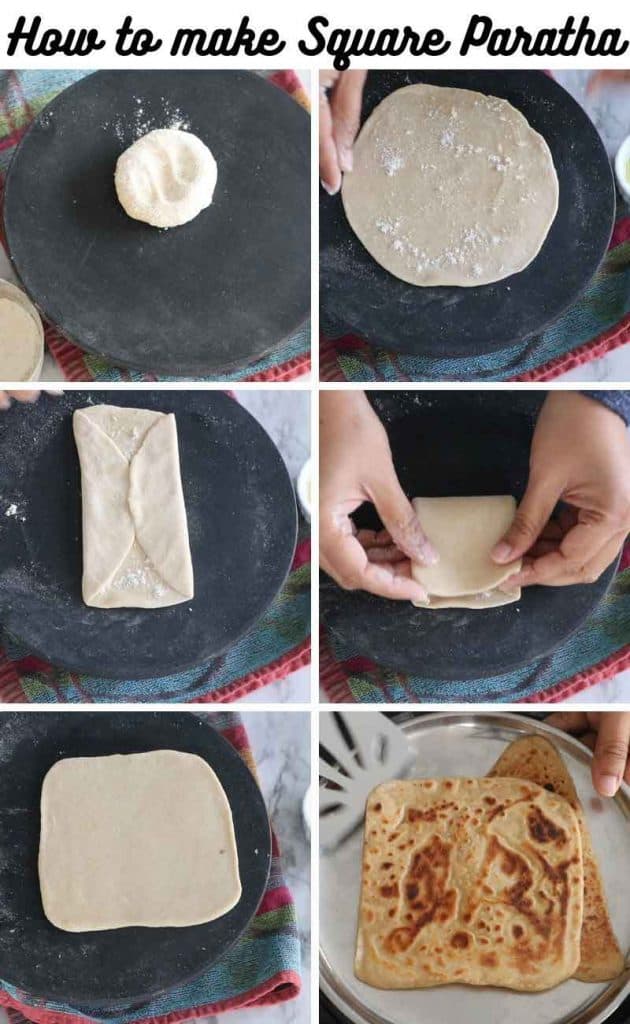
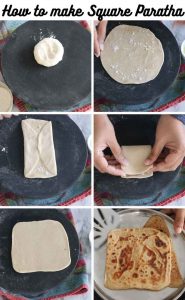
2. Square paratha
- If you like square shapes, follow these instructions.
- Start by rolling a medium-sized dough ball on a lightly floured surface to form a roughly 4-inch circle.
- Next, evenly spread a little ghee or oil and some flour on the rolled dough.
- Once oiled, fold one side halfway, then fold the other side over to overlap the first side. Next, do the fold towards the end of the dough.
- Finally, pat the square with dry flour and roll out again. You can maintain the square shape by turning the dough over as you roll. Refer to my video(given in the recipe card) and below step-by-step pictures for more details on how to roll the dough into a square shape.
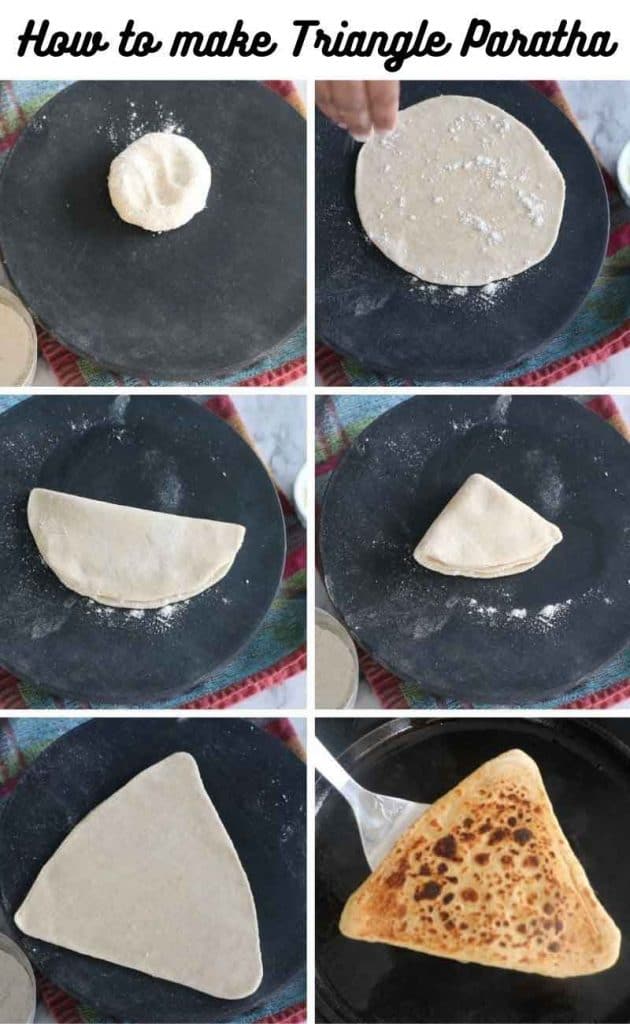
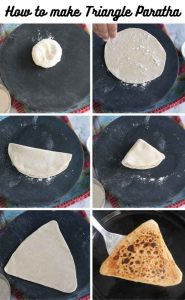
3. Triangle Paratha
- Start by rolling a medium-sized dough ball on a lightly floured surface to form a roughly 4-inch circle.
- Next, evenly spread a little ghee or oil and some flour on the rolled dough.
- Fold the rolled dough in half to form a semi-circle. Now fold from one end of the semi-circle to the other to form a triangle shape (see picture below).
- Dip again in dry flour and start rolling using the rolling pin.
- Do not apply too much pressure while rolling. Apply equal pressure on all sides while rolling. You can also turn the paratha with your hands along each edge multiple times to maintain the triangle shape while rolling. Apply more flour if required while rolling.
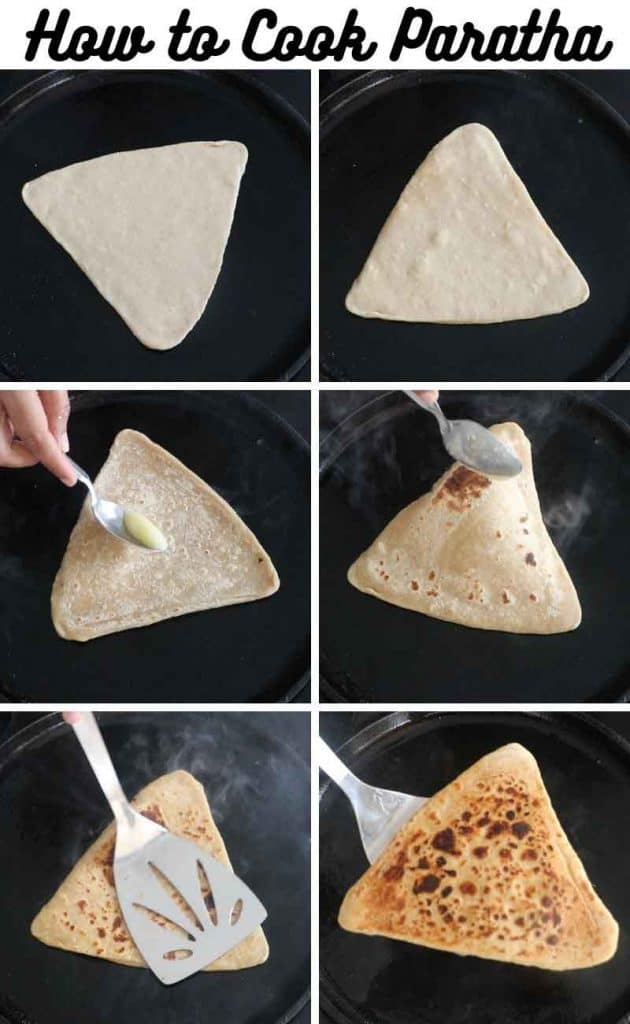
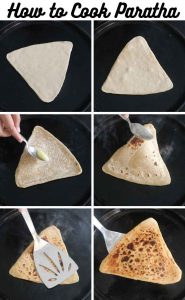
Step – 3 Cook on the Tawa?
- Preheat a nonstick or cast iron Tawa (griddle) on medium-high flame.
- Take the paratha. If there is too much flour on rolled paratha then dust off the excess flour by flipping the paratha between both your palms.
- Then Carefully transfer the paratha to the hot tawa.
- Cook until you start seeing small air pockets and the color of the dough starts to change.
- With a flat spatula, flip the paratha and apply some ghee (about ¼ teaspoon). Spread the ghee evenly over the paratha with the back of the spoon. Cook until there are some brown spots on the paratha.
- Flip the paratha and top with ghee on the other side. Spread it evenly over the surface. Cook until there are brown spots while pressing gently with the spatula.
- When both sides have golden brown spots, transfer the paratha to a plate.
- Follow the same step with the remaining parathas.
- Keep the parathas on a kitchen towel and store in a hot casserole or a Dabba until serving.
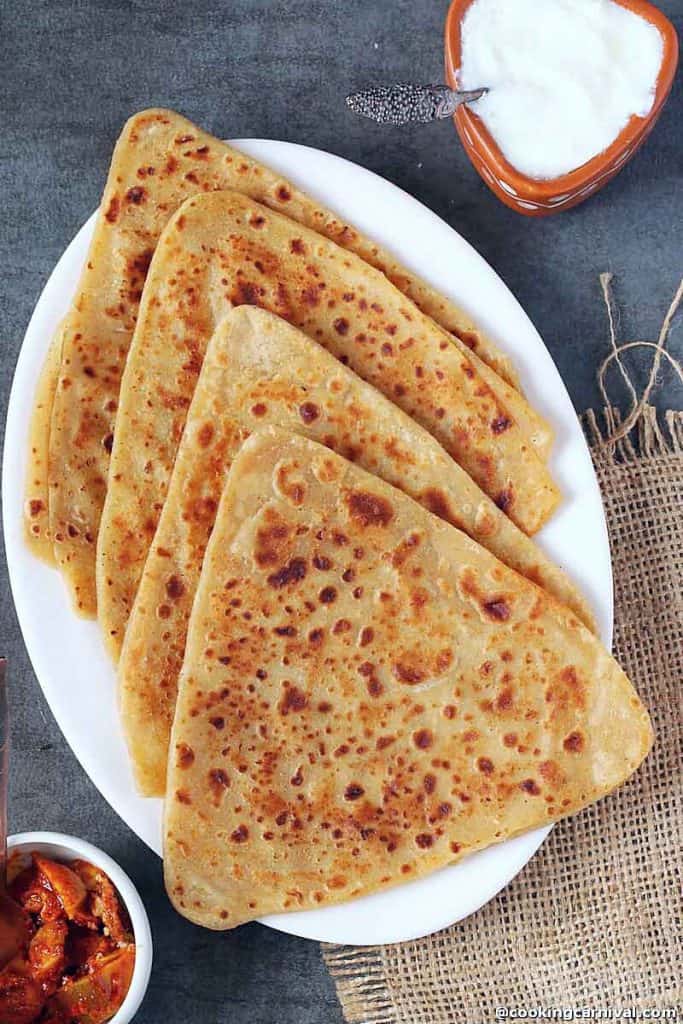
Parathas taste best served hot!
Notes and Pro-tips
- Consistency of the dough – Knead the dough well, it should be not too hard and not too soft/sticky. If the dough gets too sticky, add a tablespoon of flour at a time and knead again till all the flour is absorbed and the dough is soft and easily rollable. If the dough gets too hard, it means less water was added. Add a tablespoon of water at a time and knead again. The dough should be soft enough that if you press your finger against the dough, it leaves an impression.
- Resting the dough – Let the dough rest covered with a damp cloth for 15-30 minutes, so the gluten is released and it becomes more pliable.
- Rolling the dough – Roll the dough with a soft hand and as evenly as possible to get the same thickness. It is the most important. A uniform shape looks good but is not required to make perfect soft and flaky parathas. If you are a beginner and learning to make paratha, use more dry flour while rolling the paratha. But always dust off any excess flour before cooking on the Tawa, otherwise, the dry flour can make the paratha dry.
- To get the perfect paratha, the edges of the parathas should be thinner than the center and the thickness should be approx 1 mm. Don’t roll it thin like roti.
- Making paratha needs lots of practice. So be patient and keep practicing.
Quick FAQs
Absolutely! Simply replace the ghee with any cooking oil and you have a vegan version of the parathas.
Storing Dough– Refrigerate in an air-tight container and use within 1-2 days. After about 2 days, the dough color starts to become brownish on the outside. Get the dough to room temperature before making parathas.
Storing Paratha – Cooked paratha can be refrigerated for 2-3 days.
You can also store it in the freezer for longer shelf life. Place parchment paper between them and then place them in a freezer bag like Ziploc.
On Stovetop – Heat the tawa on medium heat. Place the paratha and each side until the paratha is soft again. Apply some ghee to make it fresher tasting.
Microwave – Keep on a paper towel and heat for 5-10 seconds.
Let the paratha cool down a bit (not completely). Then pack in an aluminum foil along with the paper towel.
You can serve any curry of your choice like
Paneer Bhurji
Palak paneer
Malai Kofta
Aloo curry
Or you can serve it with Pickle, curd, or any raita.
More Indian flat bread recipes
Have you tried this Recipe? Please feed us with your feedback, ★ star ratings, and comments below.
You can also FOLLOW me on FACEBOOK, INSTAGRAM, and PINTEREST for more fabulous recipes and updates.
Subscribe to our YouTube Channel for tasty and easy video recipes.
Whole Wheat Plain Paratha (3 different ways)
Ingredients
To make the dough
- 2 cups – Whole Wheat Flour aata
- 1 tablespoon – oil
- 1 teaspoon – salt
- ¾ cup – water you might need 1 to 2 tablespoon more water
For the layer
- 1 teaspoon – ghee
- 1 teaspoon – whole wheat flour
For cooking
- 2 tablespoon – ghee or oil
Other ingredients
- ¼ cup – whole wheat flour for dusting
Instructions
Make the dough
- In a large bowl, mix the flour, salt, and oil. Slowly add water, a little bit at a time, mixing with your hands until soft dough forms. Depending on the brand of the flour you may need more or less water so only add a little bit at a time.
- Once the dough is formed, allow resting for 10 to 20 minutes covered with damp kitchen.
- Divide the dough into 12 pieces and roll each piece on the palm of your hands into a round ball. Keep the balls covered all the time.
Round Paratha
- Dip a ball in dry flour, place it on the work surface or rolling board(chakla), and roll with the rolling pin. Roll into a circle of about 4 inches diameter.
- Apply some ghee and some flour.
- Gather all the edges and make a ball. Dust the ball again with flour and start rolling using the rolling pin.
- Do not apply too much pressure while rolling. Apply equal pressure on all sides while rolling.
- When you roll with gentle hands, the dough flattens and moves in a circular motion. You can also turn the paratha with your hands at 90 degrees multiple times while rolling so that it forms a round disc.
- Apply more flour if required while rolling.
Square paratha
- If you like square shapes, follow these instructions.
- Start by rolling a medium-sized dough ball on a lightly floured surface to form a roughly 4-inch circle.
- Next, evenly spread a little ghee or oil and some flour on the rolled dough.
- Once oiled, fold one side halfway, then fold the other side over to overlap the first side. Next, do the fold towards the end of the dough.
- Finally, pat the square with dry flour and roll out again. You can maintain the square shape by turning the dough over as you roll. Refer to my video(given in the recipe card) and below step-by-step pictures for more details on how to roll the dough into a square shape.
Triangle Paratha
- Start by rolling a medium-sized dough ball on a lightly floured surface to form a roughly 4-inch circle.
- Next, evenly spread a little ghee or oil and some flour on the rolled dough.
- Fold the rolled dough in half to form a semi-circle. Now fold from one end of the semi-circle to the other to form a triangle shape (see picture below).
- Dip again in dry flour and start rolling using the rolling pin.
- Do not apply too much pressure while rolling. Apply equal pressure on all sides while rolling. You can also turn the paratha with your hands along each edge multiple times to maintain the triangle shape while rolling. Apply more flour if required while rolling.
Cook on the Tawa
- Preheat a nonstick or cast iron Tawa (griddle) on medium-high flame.
- Take the paratha. If there is too much flour on rolled paratha then dust off the excess flour by flipping the paratha between both your palms.
- Then Carefully transfer the paratha to the hot tawa.
- Cook until you start seeing small air pockets and the color of the dough starts to change.
- With a flat spatula, flip the paratha and apply some ghee (about ¼ teaspoon). Spread the ghee evenly over the paratha with the back of the spoon. Cook until there are some brown spots on the paratha.
- Flip the paratha and top with ghee on the other side. Spread it evenly over the surface. Cook until there are brown spots while pressing gently with the spatula.
- When both sides have golden brown spots, transfer the paratha to a plate.
- Follow the same step with the remaining parathas.
- Keep the parathas on a kitchen towel and store in a hot casserole or a Dabba until serving.
Video
Notes
- Consistency of the dough – Knead the dough well, it should be not too hard and not too soft/sticky. If the dough gets too sticky, add a tablespoon of flour at a time and knead again till all the flour is absorbed and the dough is soft and easily rollable. If the dough gets too hard, it means less water was added. Add a tablespoon of water at a time and knead again. The dough should be soft enough that if you press your finger against the dough, it leaves an impression.
- Resting the dough – Let the dough rest covered with a damp cloth for 15-30 minutes, so the gluten is released and it becomes more pliable.
- Rolling the dough – Roll the dough with a soft hand and as evenly as possible to get the same thickness. It is the most important. A uniform shape looks good but is not required to make perfect soft and flaky parathas. If you are a beginner and learning to make paratha, use more dry flour while rolling the paratha. But always dust off any excess flour before cooking on the Tawa, otherwise, the dry flour can make the paratha dry.
- To get the perfect paratha, the edges of the parathas should be thinner than the center and the thickness should be approx 1 mm. Don’t roll it thin like roti.
- Making paratha needs lots of practice. So be patient and keep practicing.
Can we make Parathas vegan?
Absolutely! Simply replace the ghee with any cooking oil and you have a vegan version of the parathas.How to store Paratha and dough?
Storing Dough Refrigerate in an air-tight container and use within 1-2 days. After about 2 days, the dough color starts to become brownish on the outside. Get the dough to room temperature before making parathas. Storing Paratha Cooked paratha can be refrigerated for 2-3 days. You can also store it in the freezer for longer shelf life. Place parchment paper between them and then place them in a freezer bag like Ziploc.How to reheat paratha?
Stovetop Tawa: Heat the tawa on medium heat. Place the paratha and each side until the paratha is soft again. Apply some ghee to make it fresher tasting. Microwave: Keep on a paper towel and heat for 5-10 seconds.How to pack paratha for lunch in a box?
Let the paratha cool down a bit (not completely). Then pack in an aluminum foil along with the paper towel.Nutrition
Warm Regards,
Dhwani.



This is so tasty and filling. I used Aashirvaad Select Atta in preparing the parathas.
Glad to know Aarthi! 🙂